How do I setup my environment for SharePoint Site Mailboxes
Abstract
This article provides step by step instructions for setting up site mailboxes on-premise.
If you are using Office 365, please skip this article and move to the “Provisioning of a Site Mailbox” article as Office 365 environments have the Exchange and SharePoint pre-requisite configuration described in this article setup already.
This article will be useful for both SharePoint and Exchange administrators as the configuration process involves both environments.
In addition to the original Microsoft article (you can find the reference below) this article provides detailed steps regarding creating self-signed certificates and establishing trust relationships between SharePoint and Exchange with these certificates.
Useful References and Resources
- Configure site mailboxes in SharePoint Server 2013 (TechNet Article)
- Whitepaper: SharePoint 2013 Site Mailboxes: Overcome the limitations
System Prerequisites
- Microsoft SharePoint Server 2013 (installed in a farm configuration)
- A full installation of SQL Server (not the Express edition)
- Microsoft Exchange 2013
To skip this prerequisite section: ‘Preparing your environment for SharePoint Site Mailboxes’ and start evaluating Site Mailboxes immediately:
- Start an Office 365 Trial or use SharePoint 2013 Preview (if prior to March 2013)
- Refer to the article ‘Provisioning a Site Mailbox in SharePoint 2013’
I. User Profile Synchronization
Site Mailboxes requires user profile synchronization to be configured in the SharePoint farm.
1. Necessary accounts and installation type
To configure profile synchronization, you will:
- Need to know the SharePoint farm administrator account and the farm administrator account's password,
- Need a synchronization account for each directory service that you will synchronize with
If an account does not have the appropriate permissions, you might not know that the permissions are wrong until you have progressed part of the way through the configuration procedure.
You must have a full installation of SQL Server, not the Express edition. Profile synchronization will not work if you have installed SharePoint Server 2013 on a single server with a built-in database.
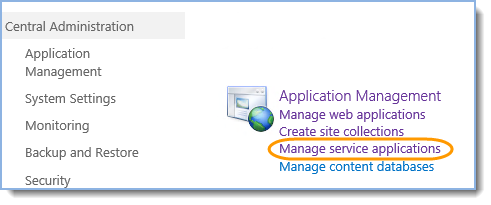
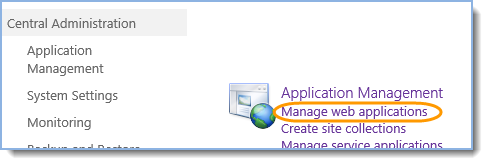
2. Creating a User Profile Service application
- Go to the SharePoint Central Administration, Application Management section and click ‘Manage service applications’:

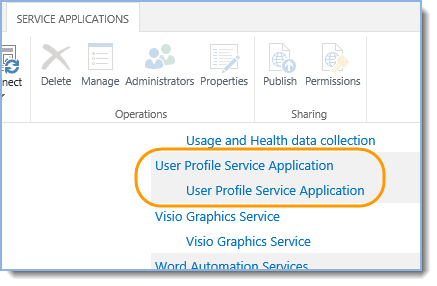
- If there is “User Profile Service Application” then skip to step 3. Enabling NetBIOS in PowerShell otherwise continue performing the following steps:
- Click New – User Profile Service Application:

- Provide a name, select default application pool and leave the rest of the options as is:
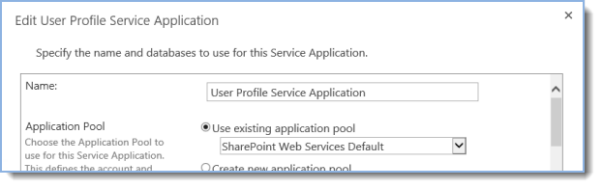
- Click “Create” and then “OK” in the Create New User Profile Service Application page.
3. Enabling NetBIOS in PowerShell
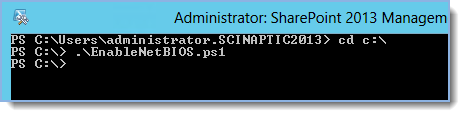
- Save the following script as EnableNetBIOS.ps1 on the SharePoint server:
$ServiceApps = Get-SPServiceApplication
	$UserProfileServiceApp = ""
	foreach ($sa in $ServiceApps)
	 {if ($sa.DisplayName -eq "<UPSAname>")
	   {$UserProfileServiceApp = $sa}
	 }
	$UserProfileServiceApp.NetBIOSDomainNamesEnabled = 1
	$UserProfileServiceApp.Update()
Where <UPSAname> is the name of the User Profile Service Application from Step d) from previous section. By default <UPSAname> is “User Profile Service Application”. - Execute the ‘EnableNetBIOS.ps1’ script by:
- Starting SharePoint 2013 Management Shell,
- Change to the directory where you saved the file
- Execute the following command (with dot and slash in front of file name):
.\EnableNetBIOS.ps1
4. Starting the User Profile Service
Even if User Profile Service Application existed before, it’s necessary to make sure services are started.
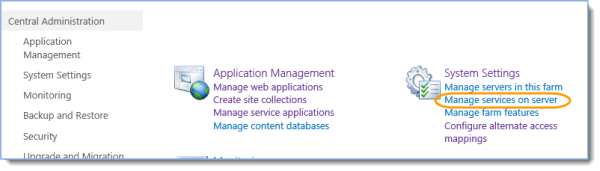
- Central Administration – System Settings – Manage Services on server:
- Find the row whose Service column value is User Profile Service. If the value in the Status column is Stopped, click Start in the Action column:

- Find the row whose Service column value is User Profile Synchronization Service. If the value in the Status column is Stopped:
- Click Start in the Action column

- In the Service Account Name and Password section, the farm account is already selected. Enter the password for the farm account in the Password box, and enter it again in the Confirm Password box.
- Manually refresh the page with the list of services until User Profile Synchronization Service status is changed from “Starting” to “Started”. This may take 10 minutes.
- Click Start in the Action column
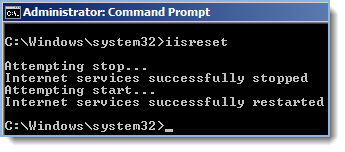
5. Reset IIS
If the SharePoint Central Administration website and the User Profile synchronization service are running on the same server, you must reset IIS after the User Profile synchronization service starts. If they are running on different servers, you may skip this procedure.
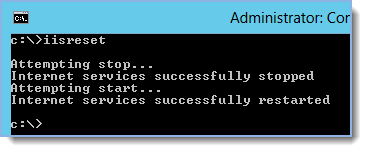
- Click Start, type “cmd” right-click on it and select “Run as Administrator”:

- Type iisreset and press Enter:
6. Creating a synchronization connection
To synchronize Site Mailboxes between Exchange and SharePoint you must have at least one synchronization connection to the Active Directory.
You must be a farm administrator or an administrator of the User Profile Service Application to perform these procedures.
You must be a member of the Administrators group on the computer that is running SharePoint Server.
Verify synchronization connection exists or create a new one.
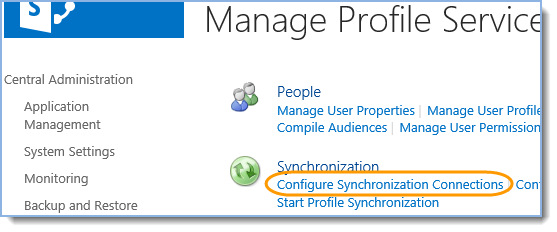
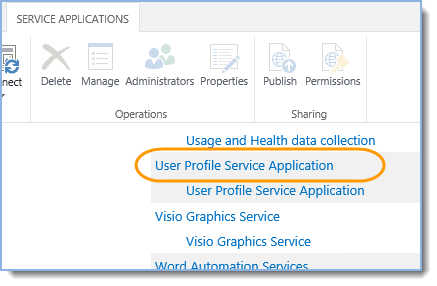
- Central Administration – Application Management – Manage service applications:
- Click on the User Profile Service Application:

- Click Configure Synchronization Connections:
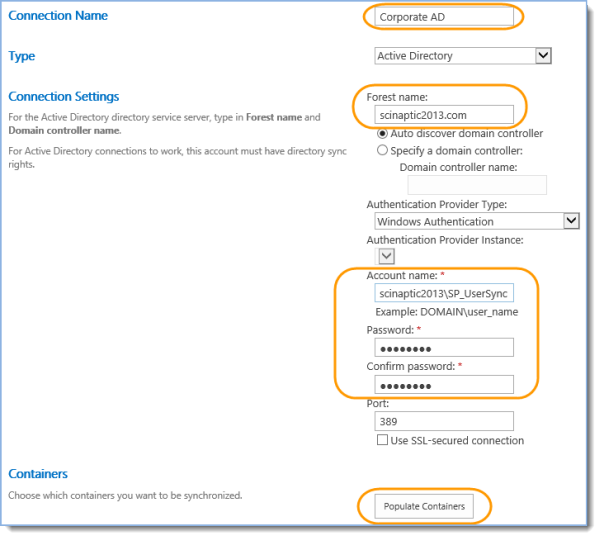
- Click “Create New Connection”; provide a connection name, forest name, account name and password.
Leave the Port number and “Use SSL-secured connection” as default.
For more information please refer to the Technet Article and contact your Active Directory Administrator.
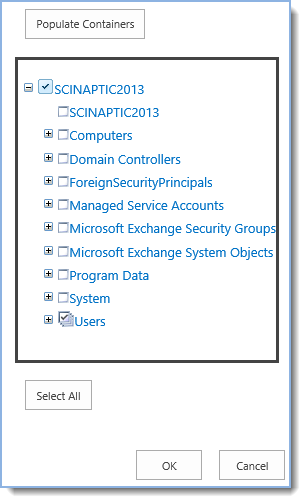
Click “Populate containers”:
- Expand the node, select “Users” and click “OK”:
7. Start Synchronization
- Central Administration – Application Management – Manage service applications:

- Click on the User Profile Service Application:
- Click “Start Profile Synchronization”:
- Select “Start Full Synchronization” and click “OK”.
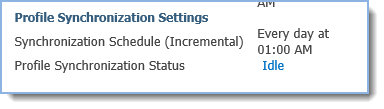
- Refresh the page and verify Synchronization Status section changes from Idle to Synchronizing and then to Idle again:
 Synchronization in process:
 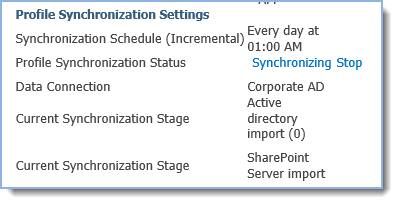 Synchronization finished:
II. App Management Service Application
The Site Mailboxes feature requires that the App Management Service application be configured in the farm.
1. Create App Management Service Application
- On Central Administration, in the Application Management section, click Manage service applications:

- If there is “App Management Service” then skip to step 2 Start App Management Service Application otherwise continue performing the following steps:
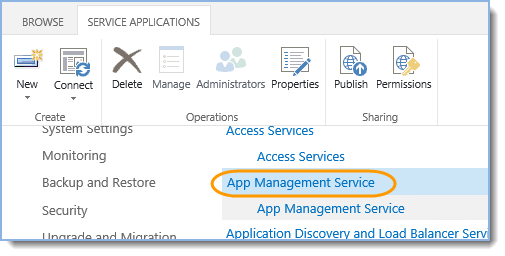
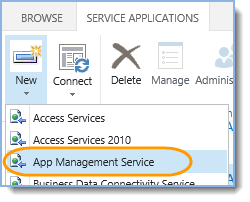
- Click New – App Management Service:
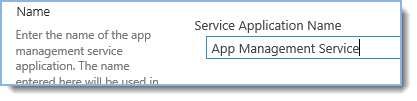
- Provide a name:
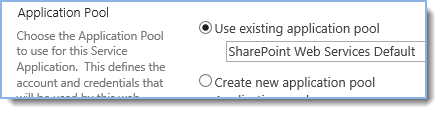
- Select default application pool:
- Check the following and click “OK”:

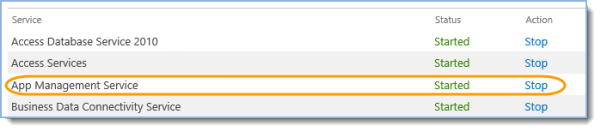
2. Start App Management Service Application
Verify App Management Service application is started.
- Central Administration – System Settings – Manage Services on server:

- Find the row whose Service column value is App Management Service. If the value in the Status column is Stopped, click Start in the Action column:
III. Creating a Claims-Based Web Application
Secure Sockets Layer (SSL) configured for the Default Zone is a requirement for web applications that are deployed in scenarios that support server-to-server authentication and app authentication.
As a prerequisite for configuring Site Mailboxes, the computer that is running SharePoint Server must have SSL configured.
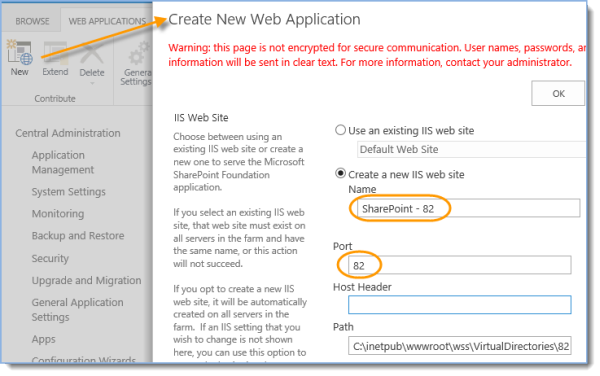
1. Creating an SSL web application
- Central Administration – Application Management – Manage web applications:
- Click “New”, provide a name and select a port:
- Change SSL option to “Yes”:
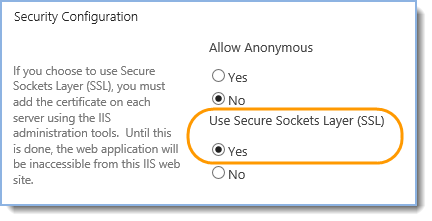
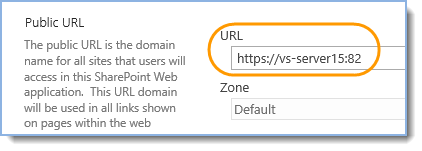
- Verify public URL contains https and port number:
- Leave other web application settings as is and click OK at the bottom of the page.
2. Create root site collection
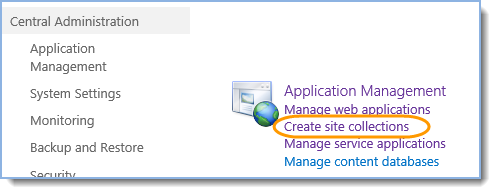
- Central Administration – Application Management – Create site collections:
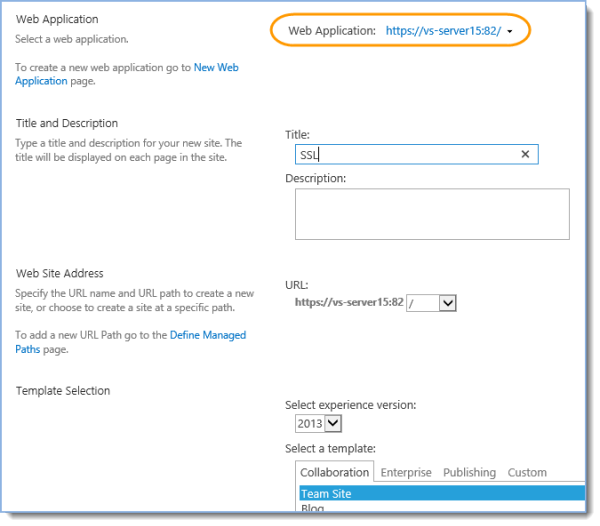
- Select web application from step 1 Creating an SSL web application, provide site collection name and select a template:
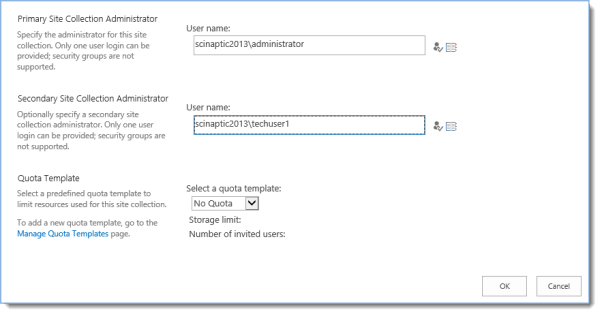
- Type site collection administrators’ logins and click OK.
IV. Creating Server Certificate
Valid certificates for both Exchange and SharePoint are required to establish OAuth Trust and Service Permissions. Follow this section to create self-signed certificate.
1. IIS Resource Kit Tools
By default IIS Manager creates self-signed certificates only for a Fully Qualified Domain Names. IIS Resource Kit Tools is required to create self-signed certificate for a short-name site URL.
- Download and install Internet Information Services (IIS) 6.0 Resource Kit Tools<
As you'll need only one file from it, IIS Resource Kit Tools could be installed on a local machine rather than on the SharePoint server. - Copy "c:\Program Files (x86)\IIS Resources\SelfSSL\selfssl.exe" to the SharePoint server, run CMD as Administrator and change to the directory where you saved the file.
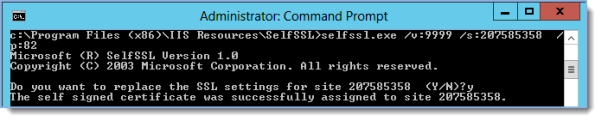
- Run the following command: selfssl.exe /v:9999 /s:<CBWAID> /p:<CBWAP>
Where- 9999 is amount of days while certificate will remain valid
- CBWAID – clams-based web application ID in IIS (207585358 on the screenshot)
- CBWAIP – port of the claims-based web-application (82 on the screenshot)
To get the CBWAID and CDWAIP open IIS Manager, click on the clams-based site, click the “Advanced settings…” link on the right hand side of IIS and copy ID.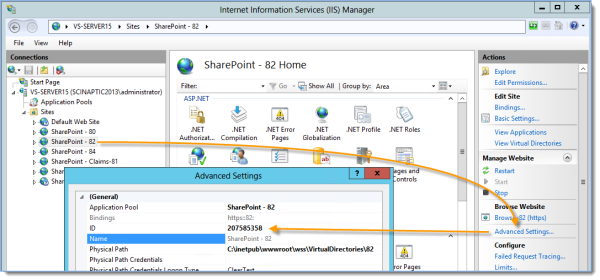
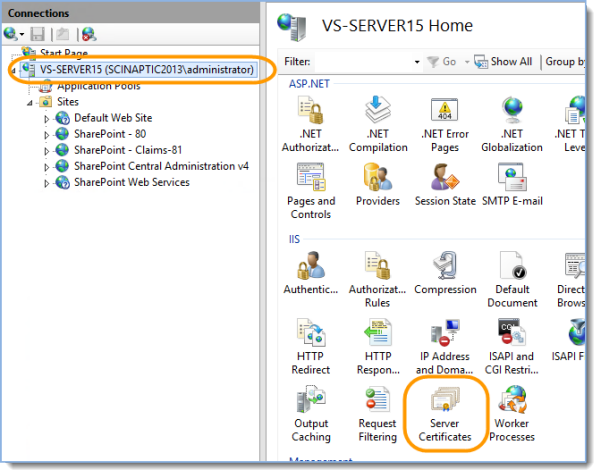
- Click on the server name in IIS Manager and open Server Certificates:
- Verify new certificate is created:

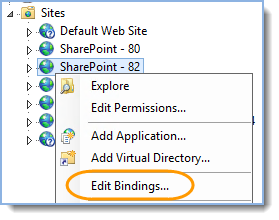
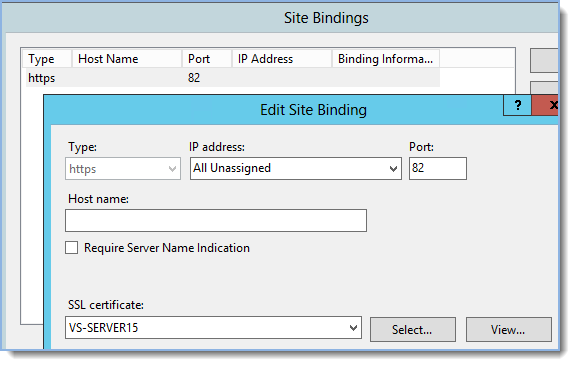
- Right-click on the clams-based site and select “Edit bindings…”
- Click Edit to verify it’s using the certificate from step e):
V. Importing the Certificates
You may need to import the Exchange Server SSL certificate from Exchange 2013 to SharePoint 2013, and from SharePoint 2013 to Exchange 2013.
This is only necessary if the certificates are self-created.
1. Importing Exchange certificate
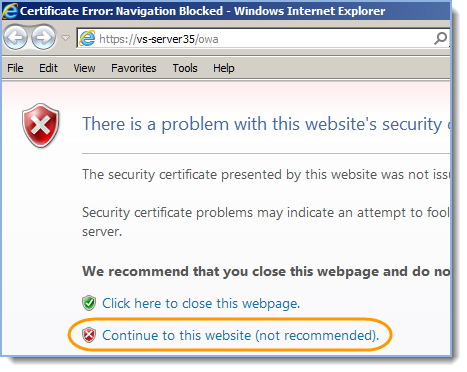
- On the SharePoint server run Internet Explorer as administrator and navigate to Outlook Web App https://<ExServerName>/owa
- Accept to trust the certificate by clicking Continue to website:
- Click Certificate Error info in Internet Explorer next to the Address bar, and then click View Certificates:
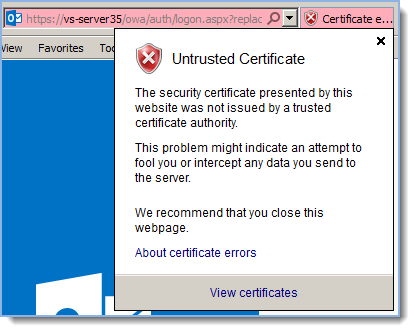
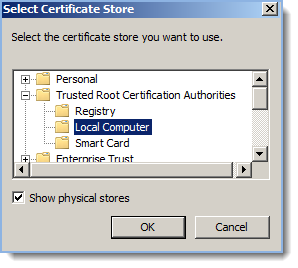
- Click Install Certificate, select “Current User”, select Place all certificates in the following store and click Browse:
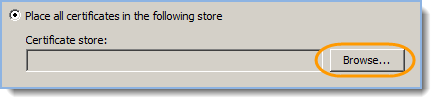
- Select the checkbox to show physical stores and Install the certificate to Trusted Root Certification Authorities > Local Computer:
- Close all Internet Explorer windows and try to navigate to Outlook Web App https://<ExServerName>/owa. Verify the certificate error is not displayed anymore.
2. Importing SharePoint certificate
- On the Exchange server open Internet Explorer and navigate to the SSL SharePoint site https://<SP>
- Accept to trust the certificate by clicking Continue to website.

- Click Certificate Error info in Internet Explorer next to the Address bar, and then click View Certificates:
- Click Install Certificate, select “Current User”, select Place all certificates in the following store and click Browse:
- Select the checkbox to show physical stores and Install the certificate to Trusted Root Certification Authorities > Local Computer:
- Close all Internet Explorer windows and try to navigate to the SSL SharePoint site https://<SP>. Verify the certificate error is not displayed anymore.
3. Importing SharePoint FQDN certificate
If you are using fully qualified domain names in your organization, please follow this step.
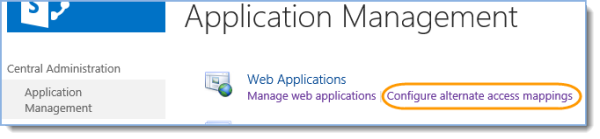
- Central Administration – Application Management – Web Applications – Configure alternate access mapping:
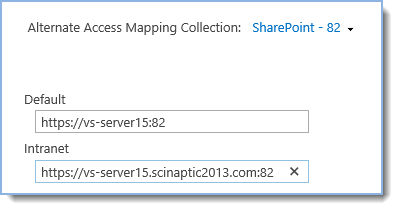
- Click “Edit Public URLs”, select created web-application and add FQDN to the “Intranet” section:
- Follow this article to configure SSL on FQDN. Scroll down to the IIS Manager section.
- Repeat 2. Importing SharePoint certificate but use SP_FQDN instead of just SP, e.g. “https://vs-server15.scinaptic2013.com:82” instead of “https://vs-server15:82”
VI. Installing Exchange Web Services API
The SharePoint Site Mailbox feature requires the Exchange Web Services (EWS) Managed API 2.0 to be installed to perform synchronization between SharePoint and Exchange.
1. Download EWSManagedAPI.msi
- On the SharePoint server download the following file (use EwsManagedApi.msi for x64 version of Windows).
- Start CMD as administrator, change to the directory where you saved the file and execute the following command:
msiexec /i EwsManagedApi.msi addlocal="ExchangeWebServicesApi_Feature,ExchangeWebServicesApi_Gac"

- Select “Install for everyone who using this computer”.
- After installation, type iisreset and press enter:
VII. Establishing Trust and Service Permission on SharePoint
The Site Mailboxes feature requires that OAuth Trust is established and Service Permissions on SharePoint 2013 Server are set up.
1. Copy and save two scripts
Download the archive, extract the files and place them on the SharePoint server with exactly the same names, do not rename the files.
2. Establishing permissions
Run the SharePoint 2013 Management Shell, change to the directory where you saved the files and execute the following command:
.\Set-SiteMailboxConfig.ps1 -ExchangeSiteMailboxDomain <Domain> -ExchangeAutodiscoverDomain <Exchange Server> -WebApplicationUrl <URL>
Where
<Domain> is the FQDN of the domain your Exchange Server is in;
<Exchange Server> is the Exchange Server that you intend to connect to;
<URL> is web application URL from step d. Verify public URL contains https and port number.
e.g.
.\Set-SiteMailboxConfig.ps1 -ExchangeSiteMailboxDomain scinaptic2013.com -ExchangeAutodiscoverDomain vs-server35.scinaptic2013.com -WebApplicationUrl vs-server15:82
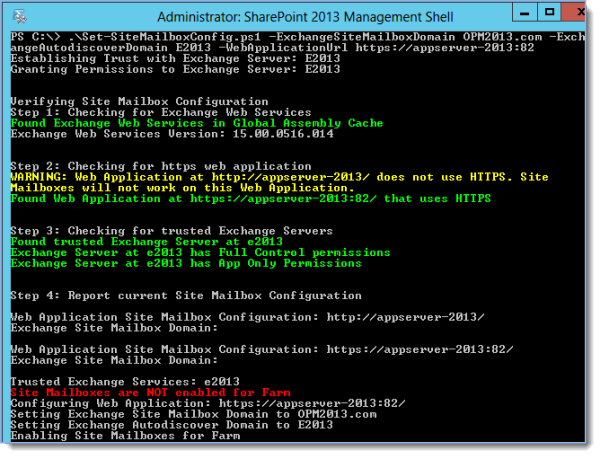
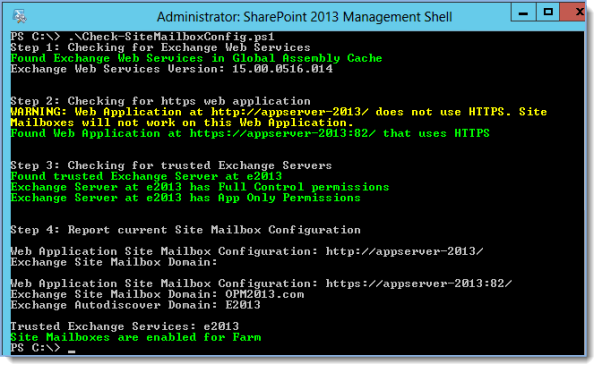
To confirm the current status of Site Mailboxes execute .\Check-SiteMailboxConfig.ps1 PowerShell script:
VIII. Establishing Trust and Service Permission on Exchange
Site Mailboxes feature requires that OAuth Trust is established and Service Permissions on Exchange 2013 are set up.
1. Running standard PowerShell script
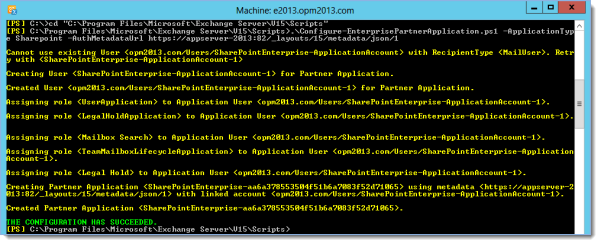
- On the Exchange Server open the Exchange Management Shell, change current path to the "C:\Program Files\Microsoft\Exchange Server\V15\Scripts" directory.
- Run the following command:
.\Configure-EnterprisePartnerApplication.ps1 -ApplicationType Sharepoint -AuthMetadataUrl https://<SP>/_layouts/15/metadata/json/1
e.g.
.\Configure-EnterprisePartnerApplication.ps1 -ApplicationType Sharepoint -AuthMetadataUrl https://vs-server15:82/_layouts/15/metadata/json/1
Your environment is now ready for provisioning a Site Mailbox in SharePoint 2013.
Please follow the article Provisioning a Site Mailbox in SharePoint 2013 for further steps.
Abstract
This article provides step by step instructions for setting up site mailboxes on-premise.
If you are using Office 365, please skip this article and move to the “Provisioning of a Site Mailbox” article as Office 365 environments have the Exchange and SharePoint pre-requisite configuration described in this article setup already.
This article will be useful for both SharePoint and Exchange administrators as the configuration process involves both environments.
In addition to the original Microsoft article (you can find the reference below) this article provides detailed steps regarding creating self-signed certificates and establishing trust relationships between SharePoint and Exchange with these certificates.
Useful References and Resources
- Configure site mailboxes in SharePoint Server 2013 (TechNet Article)
- Whitepaper: SharePoint 2013 Site Mailboxes: Overcome the limitations
System Prerequisites
- Microsoft SharePoint Server 2013 (installed in a farm configuration)
- A full installation of SQL Server (not the Express edition)
- Microsoft Exchange 2013
To skip this prerequisite section: ‘Preparing your environment for SharePoint Site Mailboxes’ and start evaluating Site Mailboxes immediately:
- Start an Office 365 Trial or use SharePoint 2013 Preview (if prior to March 2013)
- Refer to the article ‘Provisioning a Site Mailbox in SharePoint 2013’
I. User Profile Synchronization
Site Mailboxes requires user profile synchronization to be configured in the SharePoint farm.
1. Necessary accounts and installation type
To configure profile synchronization, you will:
- Need to know the SharePoint farm administrator account and the farm administrator account's password,
- Need a synchronization account for each directory service that you will synchronize with
If an account does not have the appropriate permissions, you might not know that the permissions are wrong until you have progressed part of the way through the configuration procedure.
You must have a full installation of SQL Server, not the Express edition. Profile synchronization will not work if you have installed SharePoint Server 2013 on a single server with a built-in database.
2. Creating a User Profile Service application
- Go to the SharePoint Central Administration, Application Management section and click ‘Manage service applications’:
- If there is “User Profile Service Application” then skip to step 3. Enabling NetBIOS in PowerShell otherwise continue performing the following steps:
- Click New – User Profile Service Application:
- Provide a name, select default application pool and leave the rest of the options as is:
- Click “Create” and then “OK” in the Create New User Profile Service Application page.
3. Enabling NetBIOS in PowerShell
- Save the following script as EnableNetBIOS.ps1 on the SharePoint server:
$ServiceApps = Get-SPServiceApplication
	$UserProfileServiceApp = ""
	foreach ($sa in $ServiceApps)
	 {if ($sa.DisplayName -eq "<UPSAname>")
	   {$UserProfileServiceApp = $sa}
	 }
	$UserProfileServiceApp.NetBIOSDomainNamesEnabled = 1
	$UserProfileServiceApp.Update()
Where <UPSAname> is the name of the User Profile Service Application from Step d) from previous section. By default <UPSAname> is “User Profile Service Application”. - Execute the ‘EnableNetBIOS.ps1’ script by:
- Starting SharePoint 2013 Management Shell,
- Change to the directory where you saved the file
- Execute the following command (with dot and slash in front of file name):
.\EnableNetBIOS.ps1
4. Starting the User Profile Service
Even if User Profile Service Application existed before, it’s necessary to make sure services are started.
- Central Administration – System Settings – Manage Services on server:
- Find the row whose Service column value is User Profile Service. If the value in the Status column is Stopped, click Start in the Action column:
- Find the row whose Service column value is User Profile Synchronization Service. If the value in the Status column is Stopped:
- Click Start in the Action column
- In the Service Account Name and Password section, the farm account is already selected. Enter the password for the farm account in the Password box, and enter it again in the Confirm Password box.
- Manually refresh the page with the list of services until User Profile Synchronization Service status is changed from “Starting” to “Started”. This may take 10 minutes.
- Click Start in the Action column
5. Reset IIS
If the SharePoint Central Administration website and the User Profile synchronization service are running on the same server, you must reset IIS after the User Profile synchronization service starts. If they are running on different servers, you may skip this procedure.
- Click Start, type “cmd” right-click on it and select “Run as Administrator”:
- Type iisreset and press Enter:
6. Creating a synchronization connection
To synchronize Site Mailboxes between Exchange and SharePoint you must have at least one synchronization connection to the Active Directory.
You must be a farm administrator or an administrator of the User Profile Service Application to perform these procedures.
You must be a member of the Administrators group on the computer that is running SharePoint Server.
Verify synchronization connection exists or create a new one.
- Central Administration – Application Management – Manage service applications:
- Click on the User Profile Service Application:
- Click Configure Synchronization Connections:
- Click “Create New Connection”; provide a connection name, forest name, account name and password.
Leave the Port number and “Use SSL-secured connection” as default.
For more information please refer to the Technet Article and contact your Active Directory Administrator.
Click “Populate containers”:
- Expand the node, select “Users” and click “OK”:
7. Start Synchronization
- Central Administration – Application Management – Manage service applications:
- Click on the User Profile Service Application:
- Click “Start Profile Synchronization”:
- Select “Start Full Synchronization” and click “OK”.
- Refresh the page and verify Synchronization Status section changes from Idle to Synchronizing and then to Idle again: Synchronization in process: Synchronization finished:
II. App Management Service Application
The Site Mailboxes feature requires that the App Management Service application be configured in the farm.
1. Create App Management Service Application
- On Central Administration, in the Application Management section, click Manage service applications:
- If there is “App Management Service” then skip to step 2 Start App Management Service Application otherwise continue performing the following steps:
- Click New – App Management Service:
- Provide a name:
- Select default application pool:
- Check the following and click “OK”:
2. Start App Management Service Application
Verify App Management Service application is started.
- Central Administration – System Settings – Manage Services on server:
- Find the row whose Service column value is App Management Service. If the value in the Status column is Stopped, click Start in the Action column:
III. Creating a Claims-Based Web Application
Secure Sockets Layer (SSL) configured for the Default Zone is a requirement for web applications that are deployed in scenarios that support server-to-server authentication and app authentication.
As a prerequisite for configuring Site Mailboxes, the computer that is running SharePoint Server must have SSL configured.
1. Creating an SSL web application
- Central Administration – Application Management – Manage web applications:
- Click “New”, provide a name and select a port:
- Change SSL option to “Yes”:
- Verify public URL contains https and port number:
- Leave other web application settings as is and click OK at the bottom of the page.
2. Create root site collection
- Central Administration – Application Management – Create site collections:
- Select web application from step 1 Creating an SSL web application, provide site collection name and select a template:
- Type site collection administrators’ logins and click OK.
IV. Creating Server Certificate
Valid certificates for both Exchange and SharePoint are required to establish OAuth Trust and Service Permissions. Follow this section to create self-signed certificate.
1. IIS Resource Kit Tools
By default IIS Manager creates self-signed certificates only for a Fully Qualified Domain Names. IIS Resource Kit Tools is required to create self-signed certificate for a short-name site URL.
- Download and install Internet Information Services (IIS) 6.0 Resource Kit Tools<
As you'll need only one file from it, IIS Resource Kit Tools could be installed on a local machine rather than on the SharePoint server. - Copy "c:\Program Files (x86)\IIS Resources\SelfSSL\selfssl.exe" to the SharePoint server, run CMD as Administrator and change to the directory where you saved the file.
- Run the following command: selfssl.exe /v:9999 /s:<CBWAID> /p:<CBWAP>
Where- 9999 is amount of days while certificate will remain valid
- CBWAID – clams-based web application ID in IIS (207585358 on the screenshot)
- CBWAIP – port of the claims-based web-application (82 on the screenshot)
To get the CBWAID and CDWAIP open IIS Manager, click on the clams-based site, click the “Advanced settings…” link on the right hand side of IIS and copy ID. - Click on the server name in IIS Manager and open Server Certificates:
- Verify new certificate is created:
- Right-click on the clams-based site and select “Edit bindings…”
- Click Edit to verify it’s using the certificate from step e):
V. Importing the Certificates
You may need to import the Exchange Server SSL certificate from Exchange 2013 to SharePoint 2013, and from SharePoint 2013 to Exchange 2013.
This is only necessary if the certificates are self-created.
1. Importing Exchange certificate
- On the SharePoint server run Internet Explorer as administrator and navigate to Outlook Web App https://<ExServerName>/owa
- Accept to trust the certificate by clicking Continue to website:
- Click Certificate Error info in Internet Explorer next to the Address bar, and then click View Certificates:
- Click Install Certificate, select “Current User”, select Place all certificates in the following store and click Browse:
- Select the checkbox to show physical stores and Install the certificate to Trusted Root Certification Authorities > Local Computer:
- Close all Internet Explorer windows and try to navigate to Outlook Web App https://<ExServerName>/owa. Verify the certificate error is not displayed anymore.
2. Importing SharePoint certificate
- On the Exchange server open Internet Explorer and navigate to the SSL SharePoint site https://<SP>
- Accept to trust the certificate by clicking Continue to website.
- Click Certificate Error info in Internet Explorer next to the Address bar, and then click View Certificates:
- Click Install Certificate, select “Current User”, select Place all certificates in the following store and click Browse:
- Select the checkbox to show physical stores and Install the certificate to Trusted Root Certification Authorities > Local Computer:
- Close all Internet Explorer windows and try to navigate to the SSL SharePoint site https://<SP>. Verify the certificate error is not displayed anymore.
3. Importing SharePoint FQDN certificate
If you are using fully qualified domain names in your organization, please follow this step.
- Central Administration – Application Management – Web Applications – Configure alternate access mapping:
- Click “Edit Public URLs”, select created web-application and add FQDN to the “Intranet” section:
- Follow this article to configure SSL on FQDN. Scroll down to the IIS Manager section.
- Repeat 2. Importing SharePoint certificate but use SP_FQDN instead of just SP, e.g. “https://vs-server15.scinaptic2013.com:82” instead of “https://vs-server15:82”
VI. Installing Exchange Web Services API
The SharePoint Site Mailbox feature requires the Exchange Web Services (EWS) Managed API 2.0 to be installed to perform synchronization between SharePoint and Exchange.
1. Download EWSManagedAPI.msi
- On the SharePoint server download the following file (use EwsManagedApi.msi for x64 version of Windows).
- Start CMD as administrator, change to the directory where you saved the file and execute the following command:
msiexec /i EwsManagedApi.msi addlocal="ExchangeWebServicesApi_Feature,ExchangeWebServicesApi_Gac"
- Select “Install for everyone who using this computer”.
- After installation, type iisreset and press enter:
VII. Establishing Trust and Service Permission on SharePoint
The Site Mailboxes feature requires that OAuth Trust is established and Service Permissions on SharePoint 2013 Server are set up.
1. Copy and save two scripts
Download the archive, extract the files and place them on the SharePoint server with exactly the same names, do not rename the files.
2. Establishing permissions
Run the SharePoint 2013 Management Shell, change to the directory where you saved the files and execute the following command:
.\Set-SiteMailboxConfig.ps1 -ExchangeSiteMailboxDomain <Domain> -ExchangeAutodiscoverDomain <Exchange Server> -WebApplicationUrl <URL>
Where
<Domain> is the FQDN of the domain your Exchange Server is in;
<Exchange Server> is the Exchange Server that you intend to connect to;
<URL> is web application URL from step d. Verify public URL contains https and port number.
e.g.
.\Set-SiteMailboxConfig.ps1 -ExchangeSiteMailboxDomain scinaptic2013.com -ExchangeAutodiscoverDomain vs-server35.scinaptic2013.com -WebApplicationUrl vs-server15:82
To confirm the current status of Site Mailboxes execute .\Check-SiteMailboxConfig.ps1 PowerShell script:
VIII. Establishing Trust and Service Permission on Exchange
Site Mailboxes feature requires that OAuth Trust is established and Service Permissions on Exchange 2013 are set up.
1. Running standard PowerShell script
- On the Exchange Server open the Exchange Management Shell, change current path to the "C:\Program Files\Microsoft\Exchange Server\V15\Scripts" directory.
- Run the following command:
.\Configure-EnterprisePartnerApplication.ps1 -ApplicationType Sharepoint -AuthMetadataUrl https://<SP>/_layouts/15/metadata/json/1
e.g.
.\Configure-EnterprisePartnerApplication.ps1 -ApplicationType Sharepoint -AuthMetadataUrl https://vs-server15:82/_layouts/15/metadata/json/1
Your environment is now ready for provisioning a Site Mailbox in SharePoint 2013.
Please follow the article Provisioning a Site Mailbox in SharePoint 2013 for further steps.
